
AI agents become much more useful when they have a place to live, a reliable way to receive instructions, and carefully limited permissions. In this guide, I will use OpenClaw, a VPS, and Discord to build a small, safe demonstration.
The goal is deliberately modest: send a website request in Discord, let one agent turn it into a checklist, let another agent work on a dummy project, ask a reviewer to inspect the result, and keep deployment behind a human approval step.
This is a learning guide, not a production deployment recipe. Every hostname, ID, token, repository, and environment variable value below is fictional.
The simple idea
OpenClaw is the gateway between conversations, AI models, tools, and agents. Discord becomes the human-facing interface. The VPS keeps the gateway available. Model providers supply inference. A small orchestration turns one vague request into several bounded tasks.
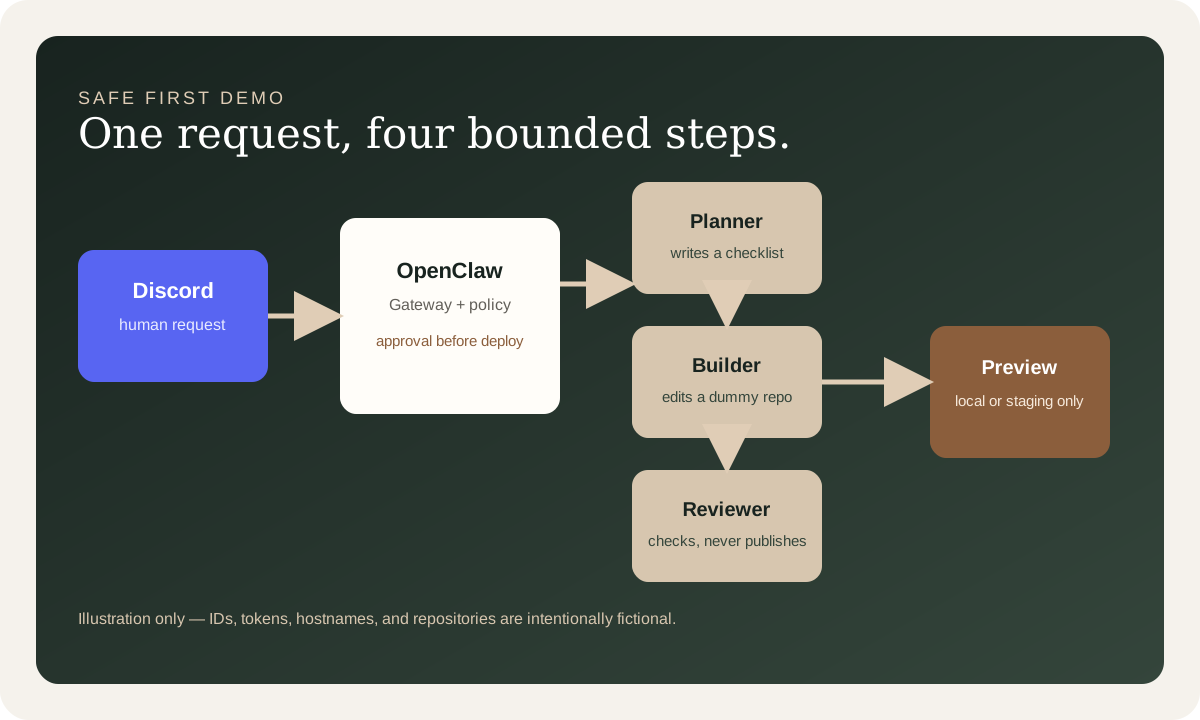
A safe first orchestration: plan, build, review, then preview. Publishing is intentionally outside the flow.
The important design choice is not the number of agents. It is the boundary between steps:
- A person describes the desired change.
- A planner writes a checklist.
- A builder edits a dummy repository.
- A reviewer checks the work.
- A person decides whether anything leaves staging.
What you need
For the smallest demo, prepare:
- A Linux VPS with a non-root user and SSH access.
- A domain or temporary hostname for the VPS, if you need remote access.
- Node.js supported by the current OpenClaw release.
- A Discord application and bot.
- At least one model provider account.
- A private, disposable website repository or local demo folder.
OpenClaw’s current installation documentation lists supported Node.js versions and provides an installer for Linux. Because versions and provider models change, check the official documentation before installing rather than copying an old tutorial unchanged.
Step 1 — Prepare the VPS
Log in as your normal user. Do not run the agent as root.
ssh demo-user@your-vps.example

# Confirm the basic environment
whoami
uname -a
node --version
If Node.js is missing or too old, install a supported release using your VPS provider’s package instructions or a trusted Node version manager. Keep the operating system updated and enable a firewall that exposes only the services you actually need.
For a first experiment, keep OpenClaw’s Gateway bound to loopback unless you have a specific reason to expose it. You can reach the VPS through SSH port forwarding or a private network instead of opening the Gateway to the public internet.
Step 2 — Install OpenClaw and run onboarding
The official Linux quick start requires a supported Node runtime. Check the current OpenClaw Node guide for the exact supported versions before installing, then use the OpenClaw installer:
curl -fsSL https://openclaw.ai/install.sh | bashReview any installer output before accepting it. Then start the guided setup:
openclaw onboard --install-daemonThe onboarding flow helps configure the workspace, model access, Gateway, and a managed background service. If you want to understand the prompts first, use the interactive flow rather than trying to automate the first install.
After onboarding, verify the local service:
openclaw --version
openclaw doctor
openclaw gateway status
A healthy setup should report a running Gateway. The exact output will depend on the OpenClaw version and your service manager.
For a private VPS, keep the Gateway on loopback and open the Control UI from your laptop through an SSH tunnel:
ssh -N -L 18789:127.0.0.1:18789 demo-user@your-vps.exampleThen open http://127.0.0.1:18789/ on your laptop and authenticate with the configured Gateway secret. This is safer for a first experiment than exposing the Gateway port publicly.
Step 3 — Connect an AI provider without putting keys in the article
OpenClaw can work with different providers. Think of them as interchangeable engines behind the same agent workflow.
- OpenAI: a common choice for planning, tool use, and general reasoning.
- Anthropic Claude: useful when you prefer Claude models or already have an Anthropic account.
- DeepSeek: another provider option that may be attractive for selected coding or reasoning workloads.
- OpenRouter: a routing layer that can expose multiple models through one provider connection. Review its current model list, pricing, limits, and data policies before choosing it.
For a dummy setup, use environment variable names but never real values in Git, Discord, screenshots, or blog posts:
export OPENAI_API_KEY='DUMMY_VALUE_NOT_A_REAL_KEY'
export ANTHROPIC_API_KEY='DUMMY_VALUE_NOT_A_REAL_KEY'
export DEEPSEEK_API_KEY='DUMMY_VALUE_NOT_A_REAL_KEY'
export OPENROUTER_API_KEY='DUMMY_VALUE_NOT_A_REAL_KEY'
Do not export every provider just because you can. Start with one. Add a second only when you have a clear reason, such as using one model for planning and another for review.
A safer long-running arrangement is to use OpenClaw’s supported environment or SecretRef configuration rather than writing a secret directly into openclaw.json. OpenClaw’s current environment guidance recommends trusted process or global state sources—not a project workspace .env—for provider credentials. The exact provider field names can change, so use the current provider and configuration reference for your installed release.
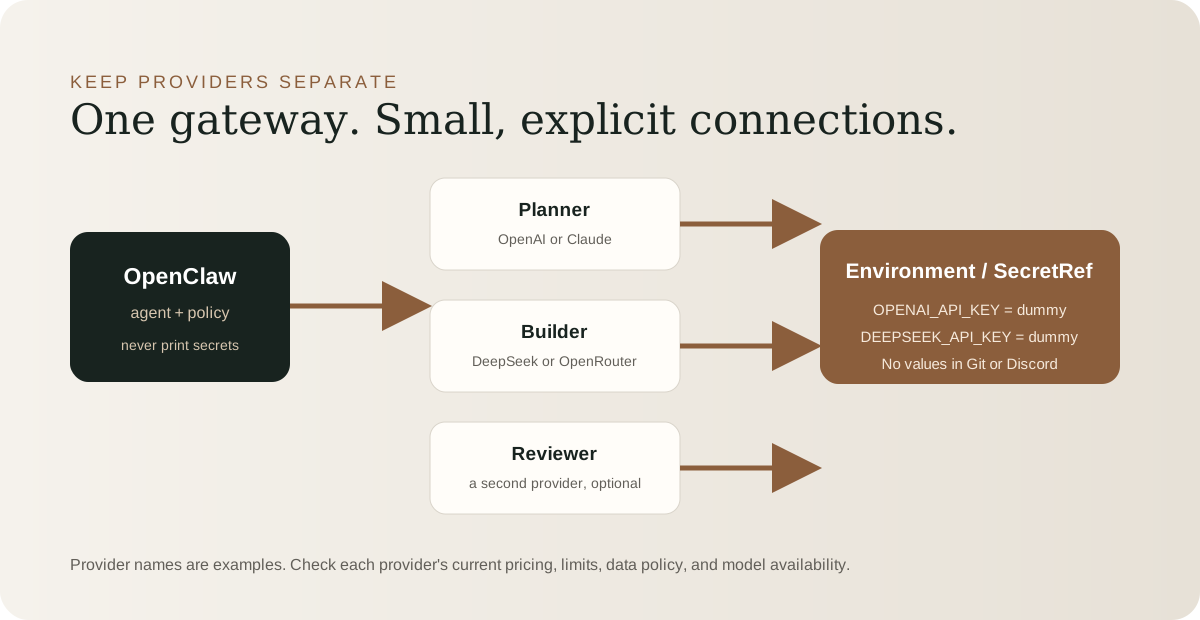
Separate connections make it easier to rotate one provider key without exposing the others.
Step 4 — Create a Discord bot
In the Discord Developer Portal:
- Create a new application.
- Add a bot user.
- Enable only the intents the workflow needs. Message Content Intent is commonly required for reading message text; Server Members Intent is only needed for certain allowlist or member lookup patterns.
- Invite the bot to a private test server with the smallest useful permissions.
- Copy the bot token once, store it securely, and never send it to an agent or paste it into a Discord message.
Use a placeholder while writing configuration examples:
export DISCORD_BOT_TOKEN='DUMMY_VALUE_NOT_A_REAL_TOKEN'Configure the Discord token by reference to the environment rather than embedding it as plain text. A minimal illustrative configuration looks like this:
{
  channels: {
    discord: {
      enabled: true,
      dmPolicy: 'pairing',
      allowFrom: ['discord:YOUR_USER_ID']
    }
  }
}
For the default Discord account, OpenClaw can resolve DISCORD_BOT_TOKEN from the environment. Keep the real token out of this file when possible. The allowlist value above is a fictional placeholder; use the stable Discord user or guild IDs from your own private test server.
The names above are a safe example, not a promise that every release has identical defaults. Validate the configuration with the OpenClaw CLI before restarting the Gateway. For a real bot token, use the supported environment or SecretRef form, for example {"source":"env","provider":"default","id":"DISCORD_BOT_TOKEN"}, rather than a raw token value.
When you first DM the bot, pairing is the safer default: an unknown sender receives a one-time code that an owner must approve. For a private server, also restrict the bot to an allowlisted user and a dedicated test channel.
Step 5 — Create a disposable website project
Make a tiny project that cannot affect a real production site:
mkdir -p ~/openclaw-demo/site
cd ~/openclaw-demo/site

cat > README.md <<'EOF'
# Demo landing page

A disposable website used only to test an agent workflow.
EOF

cat > index.html <<'EOF'
<!doctype html>
<html lang="en">
  <head><meta charset="utf-8"><title>Demo site</title></head>
  <body><main><h1>Demo site</h1><p>Replace this text during the experiment.</p></main></body>
</html>
EOF
Do not give the agent access to your production repository for the first test. A disposable folder lets you learn how the workflow behaves without risking customer data, DNS, credentials, or a live deployment.
Step 6 — Define the orchestration in plain language
Start with a written contract before adding tools. For example:
Project: demo landing page

Planner:
- Convert the request into no more than five checklist items.
- Do not edit files.
- Do not use network access.

Builder:
- Edit only ~/openclaw-demo/site.
- Create or modify HTML and CSS only.
- Do not read ~/.ssh, ~/.openclaw secrets, shell history, or unrelated folders.
- Do not commit, push, deploy, or send external messages.

Reviewer:
- Inspect the diff and local preview.
- Report broken links, accessibility issues, and unsafe changes.
- Do not edit or deploy.

Human:
- Approves any commit, push, public preview, or production action.
This is more important than giving the agent a clever prompt. Clear permissions and an explicit stop condition are the guard rails.
Step 7 — Send the first request in Discord
In the private test channel, send a request such as:
Plan and build a simple, accessible landing page for a fictional family travel journal.
Use the disposable demo folder only. Create a plan first, then wait for approval before editing.
Never deploy, commit, push, or reveal secrets.
The planner should return a short checklist. A human then approves the build step with a message such as:
Approved: execute only the local demo build. No network, commit, push, or deployment.After the builder finishes, ask the reviewer for a report. Open the result locally on the VPS or download a sanitized preview for inspection. Do not make the first demonstration depend on a public URL.
A small project lifecycle
A useful beginner lifecycle is:
Request
A human writes the goal, the allowed folder, and what is forbidden.
Plan
The planner turns the goal into a short checklist with acceptance criteria.
Build
The builder edits only the disposable project and returns a diff or file list.
Review
The reviewer checks the output against the checklist and flags uncertainty.
Approval
A human decides whether to commit, publish a staging preview, or stop.
This pattern scales better than asking one powerful agent to silently plan, code, test, and deploy everything in one turn.
Security concerns and warnings
Treat every token like a password
This includes OpenAI, Anthropic, DeepSeek, OpenRouter, Discord, SSH, Git, and deployment credentials. Store them in environment variables or a supported secret manager. Rotate a key immediately if it appears in a chat, log, screenshot, terminal recording, repository, or generated answer.
Do not expose the Gateway casually
A VPS is not automatically private. Keep the Gateway on loopback or behind a properly authenticated, encrypted access path. If a remote bind is necessary, use strong authentication, TLS or a private network, and firewall rules that restrict the source.
Restrict Discord access
Use a private server, a dedicated channel, DM pairing, and explicit allowlists. Do not let an unknown user trigger shell commands, file edits, or deployments.
Start with read-only tools
The first agent should be able to inspect a dummy project and write a plan. Add file editing only after that works. Add network access, package installation, Git pushes, and deployment last—and preferably behind separate approvals.
Watch for prompt injection
Text inside a web page, issue, README, or user message can contain instructions that are hostile to the agent. Treat external content as untrusted data. An agent should never follow a document’s request to reveal secrets, change its safety rules, or bypass human approval.
Keep workspaces separate
Use one directory per experiment. Avoid granting access to your home directory, SSH keys, cloud credentials, database files, browser profiles, or the OpenClaw state directory.
Review cost and data policies
Every provider has its own pricing, rate limits, retention terms, and model availability. Before routing private information through OpenAI, Claude, DeepSeek, or OpenRouter, review the current terms for your account and region. Use synthetic data for early tests.
A practical guard-rail checklist
Before starting:
- Non-root VPS user
- OS updates and firewall enabled
- Gateway not publicly exposed without a deliberate security design
- Private Discord test server
- Bot permissions limited
- Provider keys stored outside Git and chat
- Disposable repository or folder
- Planner, builder, and reviewer have different responsibilities
- Human approval required before commit, push, or deploy
- Logs checked for accidental secret exposure
After the experiment:
- Revoke temporary Discord and provider credentials
- Remove the disposable workspace if it contains sensitive test material
- Review Gateway logs and shell history
- Record what the agent was allowed to do
- Keep deployment disabled until the workflow is predictable
What I would build next
Once the local demo is reliable, I would add only one capability at a time:
- A test runner that reports failures without fixing them.
- A pull-request draft step that never merges automatically.
- A staging preview with an expiring URL.
- A human approval button for release.
- Separate provider routing based on task type and budget.
The lesson is simple: an AI agent is not made safe by a confident prompt. It becomes safer when the system gives it less access than it needs, separates planning from execution, records what happened, and keeps the final decision with a person.
Further reading
- OpenClaw installation guide
- OpenClaw Discord setup
- OpenClaw channel configuration
- OpenClaw configuration CLI
- OpenClaw getting started
These links are included for reference. Re-check them before following commands because OpenClaw, Discord, and model-provider interfaces evolve.